
True travel health isn’t about avoiding risks, but mastering the science of micro-contamination to turn fear into informed confidence.
- Contamination often comes from unexpected sources; ice cubes can be more dangerous than tap water due to unregulated freezing practices.
- Physical barriers and proactive disinfection are key, as even seemingly clean utensils can harbor pathogens.
- Effective water purification in remote areas requires a two-step process: physical filtration followed by chemical or UV neutralization.
Recommendation: Adopt a proactive health strategy starting 4-8 weeks before your trip. This involves more than just vaccinations; it’s a comprehensive plan for pre-conditioning your body and preparing for on-the-ground realities.
The allure of an adventurous backpacking trip through developing regions is undeniable—the vibrant cultures, the stunning landscapes, the thrill of the unknown. Yet, for many travelers, this excitement is shadowed by a persistent fear: getting sick. This anxiety can limit your experiences, making you second-guess that tempting street food stall or shy away from a refreshing drink on a hot day. The common advice often feels generic and unhelpful. You’re told to “only drink bottled water” or “be careful with what you eat,” but these platitudes offer little practical guidance when you’re faced with real-world decisions.
This approach fails to address the core of the problem. The most significant health threats aren’t always the most obvious ones. They often hide in plain sight, in the form of micro-contamination on surfaces, in “safe” drinks, or through practices you’d never consider back home. But what if the key to staying healthy wasn’t about building a wall of restrictions around your trip, but about understanding the underlying principles of hygiene and prevention? What if you could arm yourself with a specialist’s mindset to confidently assess and manage risks?
This guide is designed to do exactly that. As a travel medicine specialist, my goal is to replace your fear with knowledge. We will move beyond the basics to explore the hidden vectors of contamination and provide you with a preparatory framework. We’ll examine why ice can be a Trojan horse for pathogens, how to create a sterile eating environment anywhere, and which tools are truly effective for purifying water. By the end, you’ll have a complete protocol—covering pre-travel preparation, on-the-ground tactics, and post-travel recovery—to keep you healthy, energized, and focused on your adventure.
This article provides a detailed, step-by-step protocol for maintaining your health while traveling. The following summary outlines the key areas we will cover, from understanding hidden dangers to building a comprehensive, long-term health strategy for your journey.
Summary: A Specialist’s Protocol for Maintaining Travel Hygiene
- Why Ice Cubes Are Often More Dangerous Than Tap Water Abroad?
- How to Disinfect Utensils in Remote Areas Without Boiling Water?
- UV Pen or Pump Filter: Which Is Better for Murky River Water?
- The “Hot Food” Rule That Saves You From bacterial Gastroenteritis
- When to See a Doctor After Travel: Symptoms You Should Never Ignore
- How to Build a Preventative Health Plan That Goes Beyond Annual Checkups?
- How to Manage a Round-the-World Trip Budget to Travel for 12 Months?
- How to Reset Your Gut Microbiome to Boost Immunity and Energy?
Why Ice Cubes Are Often More Dangerous Than Tap Water Abroad?
It’s a counter-intuitive but critical concept for any traveler: the ice in your drink can pose a greater health risk than the local tap water you’re so carefully avoiding. The reason lies in a lack of regulation and a false sense of security. While you might be diligent about not drinking tap water, have you considered how the ice cooling your beverage was made? In many regions, ice is produced by independent vendors using local, untreated water sources. The freezing process does not kill most pathogens like E. coli, Norovirus, or Giardia; it merely preserves them in a dormant state, ready to become active once ingested. The risk of traveler’s diarrhea is already significant, as recent medical data shows that 20% to 60% of travelers to low-income regions will experience it.
The danger is compounded by handling practices. Ice is often transported in open bags, stored in unhygienic containers, and handled with bare hands, leading to multiple points of cross-contamination. Unlike tap water, which you can choose to avoid or treat, ice is often added to drinks by default. Even brushing your teeth with tap water can be a risk, but it’s a controlled one; a glass full of contaminated ice introduces a much larger volume of potential pathogens directly into your system. A vigilant traveler must learn to spot the difference between safe, commercially produced ice and its risky, homemade counterpart. Safe ice is typically uniform in shape and perfectly clear, often with a hole in the middle, indicating it was made with filtered water in an industrial machine. In contrast, cloudy, opaque, or irregularly shaped ice is a major red flag that it was likely frozen from untreated tap water.
When in doubt, the safest protocol is always to request drinks “no ice” (“sin hielo” in Spanish). Instead, ask for sealed, bottled, or canned beverages that have been refrigerated. This simple habit is one of the most effective, single actions you can take to prevent a debilitating bout of gastrointestinal illness from derailing your adventure. It’s a prime example of managing unseen risks.
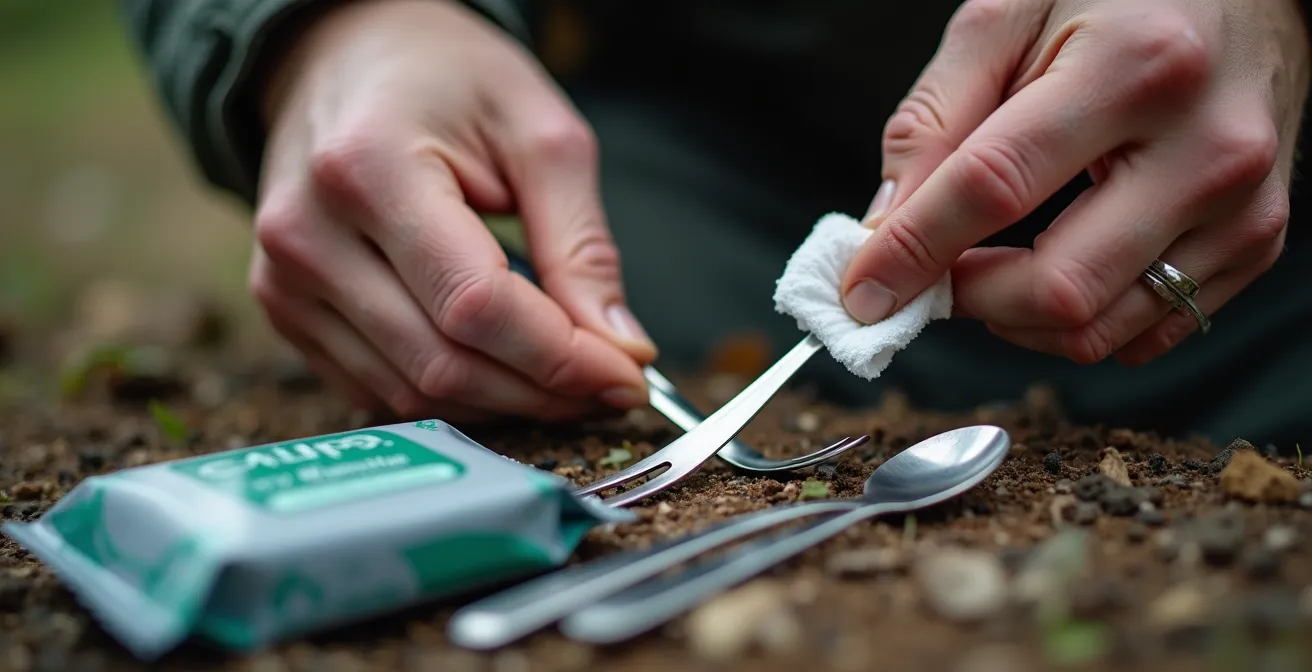
How to Disinfect Utensils in Remote Areas Without Boiling Water?
While much focus is placed on food and water purity, a common oversight for travelers is the cleanliness of their utensils. Plates, forks, and spoons at street food stalls or basic guesthouses can be a primary vehicle for micro-contamination. They may be washed in contaminated tap water, dried with a dirty cloth, or left exposed to flies. Assuming that a utensil is clean just because it looks clean is a dangerous gamble. In remote areas where boiling water isn’t practical, you need a rapid, portable, and effective disinfection method to create a safe barrier between you and potential pathogens.
One of the most effective field techniques is the “two-wipe method” using 70% alcohol wipes. It is crucial to use two separate wipes. The first wipe is for mechanically cleaning the surface, removing any visible residue or biofilm. The second, clean wipe is for disinfection, ensuring the alcohol makes full contact with the surface and is allowed to air dry for about 30-60 seconds to effectively kill bacteria and viruses. This method is simple, lightweight, and highly reliable.
Other modern solutions offer different advantages, though they come with their own considerations. Portable UV-C wands are extremely effective against a broad spectrum of pathogens but require batteries and can be more expensive. Chemical solutions like chlorine dioxide tablets can also be used to create a disinfecting rinse, but this requires time and a container. For the ultimate peace of mind, many seasoned travelers carry their own set of cutlery made from titanium or bamboo. However, even personal cutlery requires regular cleaning.
To help you decide on the best method for your travel style, it’s useful to compare the options. The following table breaks down the effectiveness, time, and portability of common field disinfection techniques, based on guidelines from health authorities. An analysis from sources like the CDC’s Yellow Book on travel health provides a strong basis for comparing these methods.
| Method | Effectiveness | Time Required | Portability | Cost |
|---|---|---|---|---|
| 70% Alcohol Wipes (Two-Wipe Method) | High for bacteria/viruses | 30-60 seconds | Excellent | Low |
| UV-C Portable Wands | Very High for all pathogens | 10-30 seconds | Good | Medium |
| Chlorine Dioxide Tablets | High but needs water | 30 minutes | Excellent | Low |
| Personal Travel Cutlery Set | Preventive measure | N/A | Good | Low-Medium |
UV Pen or Pump Filter: Which Is Better for Murky River Water?
When you’re trekking in a remote location, a reliable water source is your lifeline. The choice between a UV pen and a pump filter is a common dilemma, but the answer is not a matter of preference—it’s a matter of physics, especially when dealing with murky or turbid water. UV pens work by emitting ultraviolet light that scrambles the DNA of bacteria, viruses, and protozoa, rendering them harmless. They are incredibly fast, lightweight, and effective in clear water. However, their greatest strength is also their critical weakness: they rely on light. If the water is cloudy, suspended particles like silt, sediment, or organic matter create microscopic shadows.
This phenomenon, known as the “shadow effect,” is a serious concern. Pathogens can hide in these shadows, completely shielded from the UV rays. This means that while you might feel safe after using a UV pen on cloudy water, you could still be ingesting active pathogens. Field studies by health organizations like the CDC confirm that UV treatment is unreliable in turbid water for this very reason. Pump filters, on the other hand, work by physically forcing water through a porous membrane. A filter with a pore size of 0.1-0.2 microns will physically remove bacteria (like E. coli) and protozoa (like Giardia and Cryptosporidium). This process makes the water visually clear and safe from larger pathogens.
However, filters have their own limitation: most cannot remove viruses, which are too small to be caught in the pores. Therefore, the gold standard for treating murky water is a two-step process: first, use a pump filter to remove sediment and larger organisms, and second, treat the now-clear water with a purifier (like a UV pen or chlorine dioxide tablets) to neutralize any remaining viruses. This system redundancy is the cornerstone of safe water consumption in high-risk environments.
Your Action Plan: Two-Step Water Purification Protocol
- Filtration First: Use a ceramic or hollow-fiber pump filter (rated 0.1-0.2 microns) to physically remove all sediment, protozoa, and bacteria. The water should be visibly clear after this step.
- Purification Second: Once the water is clear, use a UV pen for the recommended time (typically 60-90 seconds) to neutralize viruses. Alternatively, add chlorine dioxide tablets and wait for the required contact time (usually 30 minutes).
- Safe Storage: Store your treated water in a clean, sealed container. Be careful not to contaminate the container’s opening with unwashed hands or by dipping it back into an untreated source.
- Prevent Recontamination: Always wash your hands with soap and water (or use hand sanitizer) before handling your clean water supply or drinking from your bottle.
- Build Redundancy: For any serious remote travel, carry both a primary filter and a backup purification method. A filter can clog or break, and a UV pen’s batteries can die. Redundancy is not paranoia; it’s professional preparation.
The “Hot Food” Rule That Saves You From bacterial Gastroenteritis
Enjoying street food is one of the great joys of travel, but it also presents one of the most common health risks. To navigate it safely, you need a simple, reliable principle. The “Hot Food” rule—or more accurately, the “Cooked Hot, Served Hot” rule—is your most powerful tool against bacterial gastroenteritis. The science behind it is straightforward. Harmful bacteria thrive in what food safety experts call the “temperature danger zone,” which is between 40°F and 140°F (4°C and 60°C). Foods left sitting at room temperature fall squarely within this zone, allowing bacteria to multiply to dangerous levels.
When you choose a food vendor, your primary observation should be their cooking process. Look for vendors who cook food to order over high, roaring flames. The visible steam and sizzle are your assurance that the food has been heated well above the danger zone, killing most active bacteria. Conversely, you should be extremely cautious of food that has been pre-cooked and is now sitting in a lukewarm bain-marie or on a tray. Even if it was cooked properly hours ago, it has had ample time to become re-contaminated and for bacteria to proliferate. This is why a busy stall with a high turnover of freshly cooked food is often a safer bet than a quiet one.

This rule extends to the ingredients themselves. The safest options are foods that are thoroughly cooked through, like grilled meats, stir-fries, and soups. You should be wary of anything raw or uncooked, especially in areas with questionable water quality. This includes salads, uncooked garnishes like cilantro, and fruit you haven’t peeled yourself. As travel medicine experts at NewYork-Presbyterian advise, sticking to thoroughly cooked meat and avoiding raw vegetables and unpasteurized dairy from small vendors is a cornerstone of a safe travel diet. By prioritizing food that is visibly steaming hot, you are actively selecting meals that have been thermally disinfected just moments before you eat them.
When to See a Doctor After Travel: Symptoms You Should Never Ignore
Most cases of traveler’s diarrhea are self-limiting and resolve within a few days with rest and oral rehydration. However, it is absolutely critical to know when a seemingly minor issue has crossed the line into a medical problem requiring professional attention. Ignoring warning signs can lead to severe dehydration or allow a more serious infection to take hold. A key guideline is the 72-hour rule: if diarrhea persists for more than three days, it’s time to seek medical advice. This is especially true if your symptoms are not improving or are getting worse.
Beyond the duration, there are several “red flag” symptoms that demand immediate medical care, regardless of the timeline. These include: a high fever (above 102°F or 39°C), the presence of blood or mucus in your stool, severe abdominal pain or cramping, and signs of severe dehydration (such as dizziness, a lack of urination, or a rapid heartbeat). These symptoms suggest a more aggressive bacterial infection, like dysentery, or a parasitic infection that will not resolve on its own. When you see a doctor, be prepared to give a detailed history, including when the symptoms started and a list of foods and drinks you consumed in the 24-48 hours prior.
It’s also crucial to understand that not all travel-related illnesses appear during your trip. Some have long incubation periods and may only manifest weeks or even months after you’ve returned home. This is why your travel history is a vital piece of medical information. As Dr. Ole Vielemeyer, a travel medicine expert, emphasizes, this delayed onset is a critical factor to be aware of.
Delayed-onset symptoms can appear weeks or even months post-travel, such as persistent fevers from Malaria or severe joint pain from Dengue. The critical importance is telling your doctor your travel history.
– Dr. Ole Vielemeyer, NewYork-Presbyterian Travel Medicine
If you experience any unusual or persistent symptoms after returning from a high-risk area—such as recurring fevers, unexplained weight loss, or persistent digestive issues—schedule a check-up immediately and make sure to inform your doctor about your recent travels. This context can be the key to a correct and timely diagnosis.
How to Build a Preventative Health Plan That Goes Beyond Annual Checkups?
The most effective way to stay healthy while traveling is to adopt a proactive, not reactive, mindset. A robust preventative health plan begins long before you pack your bags. While an annual checkup is a good baseline, preparing for travel in developing regions requires a targeted strategy that starts at least 4-8 weeks before departure. This timeline is crucial because it allows adequate time for vaccinations to become fully effective and for other preventative measures to take hold. A consultation with a travel medicine specialist is the first step. They can provide personalized recommendations based on your specific itinerary, activities, and medical history.
Your plan should focus on two key areas: strengthening your body’s defenses and mapping out location-specific risks. To bolster your gut immunity, medical research supports starting a specific probiotic strain like Saccharomyces boulardii several weeks before your trip. This can help fortify your gut microbiome, making it more resilient to foreign pathogens. The CDC’s travel health guidelines also stress this pre-travel consultation window for assessing vaccine needs. Some vaccination series require multiple doses spaced weeks apart, and others, like Yellow Fever, have a waiting period before they are considered valid for entry into certain countries.
Beyond vaccinations, a critical part of your plan is to use resources like the CDC’s destination-specific pages to create a personalized risk map. These pages list not only required vaccines but also recommended ones based on the types of activities you’ll be doing (e.g., trekking vs. staying in urban centers). They also highlight non-vaccine-preventable diseases like dengue, Zika, or schistosomiasis, providing guidance on mosquito protection or avoiding freshwater exposure. Building this plan empowers you to move from a general state of anxiety to a position of informed preparedness, armed with specific knowledge and a timeline for action.
How to Manage a Round-the-World Trip Budget to Travel for 12 Months?
For a long-term trip, your health is not just a matter of comfort; it’s a financial asset. An unexpected illness can be one of the quickest ways to derail a carefully planned budget, leading to costly medical bills, expensive last-minute flights home, and lost, non-refundable deposits. Therefore, managing your travel budget effectively means strategically allocating funds for health and safety. This shouldn’t be seen as an expense, but as a high-return investment in the longevity and success of your journey.
Consider the return on investment (ROI) of a few key health-related purchases. A high-quality water filter might seem like a significant upfront cost, but it can save you hundreds of dollars over a year compared to buying bottled water daily, all while preventing illness. Opting for a slightly more expensive guesthouse with verifiable reviews for cleanliness might add a few dollars to your nightly cost, but it can prevent a multi-thousand-dollar medical emergency. The same logic applies to comprehensive travel insurance that includes medical evacuation—its cost is a fraction of the catastrophic expense of an emergency airlift.
As the International Citizens Travel Health Advisory notes, this framing is essential for smart long-term travel.
Skimping on health and safety costs more in the long run. Frame it as an investment, not an expense – the small extra cost of cleaner accommodations prevents massive costs from getting sick.
– International Citizens Travel Health Advisory, International Citizens Travel Insurance Guide
The following table illustrates how seemingly small upfront health investments can provide massive financial protection, ensuring your 12-month trip isn’t cut short to 12 weeks. When you build your budget, create a dedicated “Health & Safety” category that includes your filter, a comprehensive first-aid kit, insurance, and even a buffer for choosing safer food and lodging options. This is the budget that protects all your other travel investments.
| Health Investment | Upfront Cost | Potential Savings | Risk Mitigation |
|---|---|---|---|
| Quality Water Filter | $30-100 | $500+ in bottled water | Prevents waterborne illness |
| Travel Insurance with Evacuation | $200-500/month | $50,000+ emergency costs | Medical emergencies covered |
| Comprehensive First Aid Kit | $50-150 | $200+ in local pharmacies | Immediate treatment available |
| Clean Accommodation Upgrade | $5-10/night extra | $1000+ in medical bills | Reduced infection risk |
Key Takeaways
- The greatest health risks often come from hidden sources of micro-contamination, such as unregulated ice and improperly washed utensils, not just obvious dangers.
- A two-step water treatment process—physical filtration followed by chemical or UV purification—is the gold standard for safely treating murky water in the field.
- Proactive health planning, starting 4-8 weeks before departure with professional consultation and gut-strengthening supplements, is far more effective than reacting to illness on the road.
How to Reset Your Gut Microbiome to Boost Immunity and Energy?
Even with the best precautions, extended travel through diverse environments can disrupt your gut microbiome—the complex ecosystem of bacteria in your digestive system. This disruption can lead to lingering digestive issues, lowered immunity, and fatigue even after you’ve returned home. A dedicated post-travel gut reset is the final, crucial step in your travel health protocol. The goal is to soothe inflammation, repopulate beneficial bacteria, and restore diversity to your gut ecosystem. This process should be approached in structured phases to avoid overwhelming your system.
The first phase, lasting about 5 days, is all about soothing and simplifying. Focus on easy-to-digest, low-inflammatory foods. Bone broth, plain white rice, steamed vegetables, and baked chicken or fish can provide essential nutrients without stressing your digestive tract. During this phase, it’s wise to avoid common irritants like dairy, gluten, processed sugar, and raw foods. The objective is to calm any residual inflammation from your travels and create a stable environment for healing. This is not a long-term diet, but a short-term therapeutic intervention to give your gut a much-needed rest.
Next, over the following two weeks, you enter the repopulation and diversification phase. Gradually reintroduce prebiotic fibers from a wide variety of cooked vegetables—these act as food for your good bacteria. Then, begin to add probiotic-rich fermented foods like plain kefir, yogurt, sauerkraut, or kimchi. These introduce beneficial bacterial strains back into your system. Finally, expand your diet to include a rich diversity of whole foods, including legumes, whole grains, nuts, seeds, and as many different types of plants as possible. A diverse diet leads to a diverse—and more resilient—microbiome. For travelers who experienced significant digestive distress, comprehensive stool testing can identify specific imbalances like parasites or bacterial overgrowth that may require targeted medical treatment.
Your health is the most valuable asset you have on any adventure. By moving beyond common platitudes and adopting a specialist’s approach to hygiene and prevention, you transform fear into confidence. The next logical step is to translate this knowledge into a personalized action plan. Schedule a consultation with your doctor or a travel medicine specialist at least a month before your departure to build a strategy tailored to your unique journey.