Preventing budget overruns is not about tracking receipts; it’s about executing a rigid sequence of risk-mitigation protocols before construction even begins.
- The most critical financial failures occur in the first three months, triggered by poor initial sequencing and unvetted assumptions.
- Your financial plan’s success hinges on a “pre-mortem” analysis that identifies and mitigates risks like zoning errors and supply chain delays upfront.
Recommendation: Before hiring anyone, complete a comprehensive zoning and easement due diligence checklist. This single action can prevent the most costly and time-consuming setbacks.
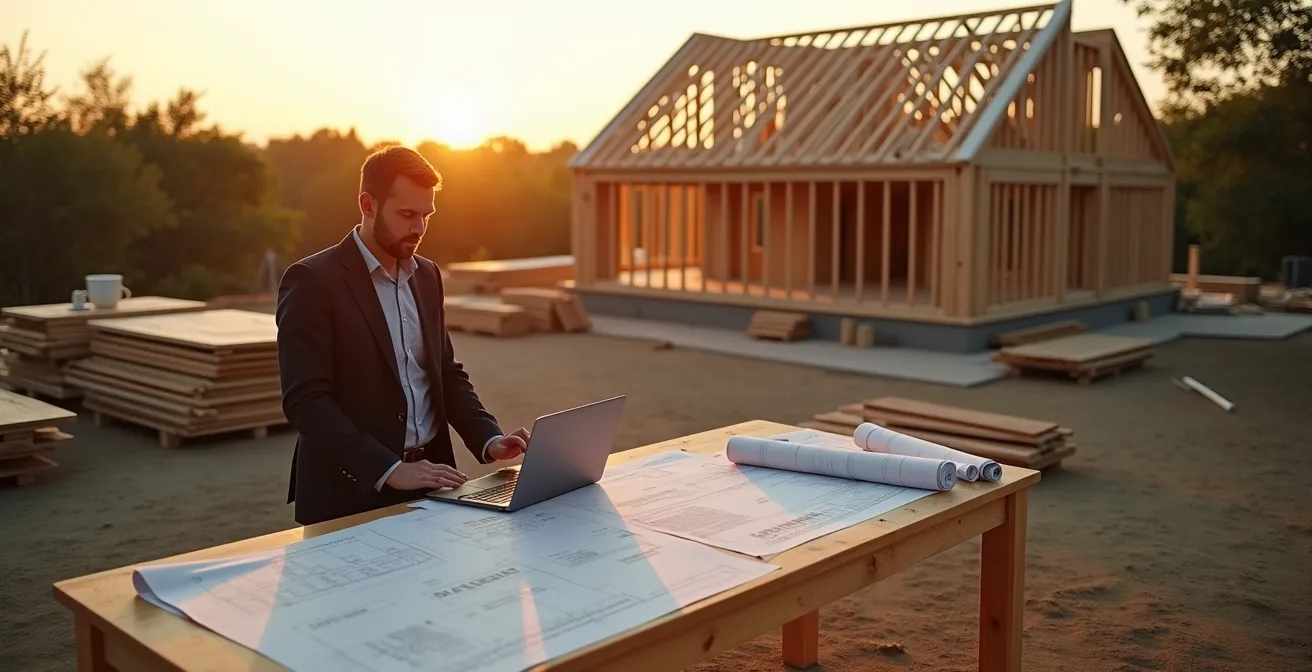
The dream of a self-build project—a home tailored perfectly to your vision—is a powerful one. Yet, for many aspiring homeowners, this dream quickly sours into a financial nightmare of spiraling costs and unforeseen delays. The common advice is to “add a contingency fund” or “track your expenses meticulously.” While not wrong, this advice is dangerously incomplete. It treats the symptom, not the disease. It positions you as an accountant, passively recording overspends after they’ve already happened.
The reality is that successful project management is not about accounting; it’s about control. It’s about establishing a rigid operational framework that anticipates failure points and neutralizes them before they can trigger a budgetary cascade. The most catastrophic financial damage isn’t done by a single large expense, but by a series of small, early-stage miscalculations in planning, team selection, and scheduling that compound over time. This is where the 20% contingency disappears before the foundation is even fully cured.
But what if the key wasn’t simply having a bigger budget, but having a better system? This guide abandons generic financial tips. Instead, it provides a project manager’s framework, focusing on the critical sequence of decisions and non-negotiable checkpoints that secure your budget from the outset. We will not be talking about saving money on paint colours; we will be talking about the structural and procedural decisions that determine whether your project succeeds or becomes another cautionary tale. This is your operational manual for building on-budget, on-time, and without compromise.
For those who prefer a visual overview, the following video offers a look into the self-build journey, complementing the strict protocols outlined in this guide.
To navigate this complex process effectively, this article is structured around the key pillars of project control. The following summary outlines the critical checkpoints we will cover, from initial budget failures to the final details of interior design execution.
Summary: A Project Manager’s Framework for On-Budget Self-Builds
- Why Most Self-Build Projects Go Over Budget Within the First 3 Months?
- Architect or General Contractor: Who Should You Hire First for a Major Renovation?
- How to Build a Construction Schedule That Accounts for Weather Delays?
- The Zoning Mistake That Can Halt Your Construction for 6 Months
- When to Inspect the Foundation: The Critical Checkpoint You Cannot Miss
- How to Build a Real Estate Financial Plan That Secures Bank Approval?
- How to Prioritize Energy Efficiency Renovations for Maximum Bill Reduction?
- How to Execute a Professional-Level Interior Design Project on a Mid-Range Budget?
Why Most Self-Build Projects Go Over Budget Within the First 3 Months?
The belief that budgets fail mid-project is a fundamental misconception. In reality, the financial fate of a self-build is often sealed within the first 90 days, long before the structure takes shape. This early-stage failure is not due to a single catastrophic event but a “budgetary cascade failure” initiated by unvetted assumptions and poor sequencing. The issue is systemic: industry analyses reveal that an astonishing 98% of construction projects globally experience cost overruns, a clear indicator that conventional planning is flawed.
The primary trigger is often an underestimation of “soft costs” and site preparation. Future homeowners focus on the visible—lumber, windows, fixtures—while neglecting the preliminaries like permits, insurance, utility connections, and surveyor fees, which can constitute 15-20% of the total budget. When initial site work, like excavation or grading, exceeds its line item by even 10%, a red flag should be raised. This initial overspend forces a choice: draw from the main contingency fund too early or delay subsequent phases. Both options are disastrous.
The second accelerator is scope creep. A seemingly minor change, such as moving a window or adding a small extension after plans are finalized, does not just add the cost of that one item. It creates a ripple effect, impacting structural engineering, electrical plans, plumbing runs, and material orders. Each change introduces coordination friction and potential delays, which have their own cost. Documenting every single scope modification, no matter how small, is a non-negotiable protocol to understand where and why the budget is deviating from the plan. Without this strict control, the project’s financial foundation erodes before the concrete is even poured.
Architect or General Contractor: Who Should You Hire First for a Major Renovation?
The first major decision in your project’s critical path is who to hire first. This choice dictates the entire workflow, budget structure, and risk profile of your build. There is no universally “correct” answer, only the “correct” sequence for your specific project’s complexity and your level of risk tolerance. Each approach presents a distinct trade-off between design freedom, cost control, and timeline efficiency. The key is to make this decision with a clear understanding of its downstream consequences.
Hiring an architect first is the traditional route, ideal for complex, custom designs where a unique vision is paramount. However, this path carries a high risk of creating beautiful but unbuildable or prohibitively expensive plans. The design phase can extend the timeline by months, and cost estimates from the architect are often optimistic, leading to painful revisions when contractors provide real-world bids. Conversely, hiring a contractor first can be faster and potentially more budget-friendly, as they design with practical construction methods and costs in mind from day one. The trade-off is often a limitation in creative or complex design options.
For major renovations, a hybrid model known as Integrated Project Delivery (IPD) Lite or a Design-Build firm often offers the best balance. This involves bringing both the designer and builder to the table concurrently, fostering real-time feedback. The architect’s vision is immediately checked against the contractor’s cost and feasibility analysis, minimizing the risk of expensive redesigns and building a more realistic budget from the start.
The following table breaks down the strategic implications of each hiring sequence, a critical step in your pre-mortem analysis.
| Approach | Cost Impact | Timeline | Risk Level | Best For |
|---|---|---|---|---|
| Architect First | +5-10% design fees upfront | +2-3 months planning | High (unbuildable designs) | Complex custom designs |
| Contractor First | -15% potential savings | Faster start | Medium (limited design options) | Simple renovations |
| IPD Lite (Concurrent) | +3% coordination fee | Balanced timeline | Low (real-time feedback) | Major renovations |
| Design-Build Firm | Fixed price possible | Streamlined | Medium (less oversight) | First-time builders |
How to Build a Construction Schedule That Accounts for Weather Delays?
A construction schedule is not a simple to-do list; it is a dynamic risk management tool. A common failure point in self-build projects is a rigid, optimistic timeline that does not account for the single most uncontrollable variable: weather. A schedule that shatters after the first major storm is not just an inconvenience; it triggers a cost cascade of idle crews, material storage fees, and scheduling conflicts with subcontractors. A professional-grade schedule is built on a foundation of data-driven pessimism.
The first step is to identify the critical path. These are the sequential tasks that directly impact the project’s end date, such as foundation, framing, and roofing. These must be distinguished from non-critical tasks (e.g., interior painting) that can be performed in parallel. Weather-dependent tasks on this critical path are your highest-risk items. Using historical weather data for your specific location, you can calculate the probable number of workdays that will be lost during certain months and build that buffer directly into the schedule. A standard protocol is to add a 30% time buffer to any weather-dependent critical path task scheduled during volatile seasons (e.g., November-March in many climates).
This visualization shows a project manager cross-referencing weather data with a project timeline, a core discipline of proactive scheduling.

Furthermore, a resilient schedule must have built-in flexibility. For every major exterior milestone (e.g., “complete roofing”), you should create a parallel ‘Plan B’ list of interior tasks that can be initiated if the exterior work is delayed. This keeps crews productive and maintains project momentum. Using modern scheduling apps allows for dynamic adjustments based on real-time forecasts, but these tools are only as effective as the contingency planning behind them. The industry standard is to build a total contingency time of 15-20% into the overall project timeline, separate from any single task’s buffer.
The Zoning Mistake That Can Halt Your Construction for 6 Months
Of all the pre-construction risks, zoning and land-use regulations are the most lethal. A hidden easement or a misunderstood covenant is not a problem that can be solved with more money; it is a legal barrier that can halt a project for months, or in the worst cases, render it completely unviable. Assuming a basic zoning report is sufficient is a catastrophic error. True due diligence requires a forensic-level investigation into every layer of legal restriction tied to the property before you even own it.
These issues are often invisible to the untrained eye. An innocuous-looking utility box on the edge of a plot could signify a major buried service line. The discovery of such hidden infrastructure can lead to astronomical costs, as illustrated in one real-world project.
Case Study: The Hidden Easement Discovery
In a project detailed by self-build experts, a local electricity authority demanded £25,000 to move an existing cable and transformer. This critical information about services buried under the plot was not revealed until the late-stage purchase searches. Such easements, which grant service providers rights over your land, can make a planned building footprint impossible if not discovered during the initial due diligence phase, before the land purchase is finalized.
Beyond easements, you must investigate designation overlays. Is the property in a Conservation Area, an Area of Outstanding Natural Beauty (AONB), a flood zone, or a high-fire-risk zone? Each of these designations comes with its own set of stringent building restrictions. Furthermore, if you plan to utilize Permitted Development rights (where applicable), you must have the original building volume professionally calculated, as these rights are often based on a percentage of the existing structure. Verifying all findings in writing with the local planning authority is the final, non-negotiable step to de-risk the project.
Your Non-Negotiable Due Diligence Checklist
- Order a full title search that explicitly includes all easements, covenants, and rights of way, not just a basic zoning report.
- Check official maps for designation overlays: Conservation Areas, AONB, flood zones, and local fire risk zones.
- Obtain historical building plans to calculate the exact original building volume if claiming Permitted Development rights.
- Commission a professional surveyor to verify all proximity-to-boundary measurements against local setback requirements.
- Submit a formal inquiry to the local planning authority to get written confirmation that your proposed plans comply with all known regulations.
When to Inspect the Foundation: The Critical Checkpoint You Cannot Miss
The foundation is the single most important structural element of your home, and there are no second chances to get it right. Any defects, from improper curing to inadequate waterproofing, will manifest as major, expensive problems years down the line. A “pour and forget” attitude is a recipe for disaster. A strict, multi-stage inspection protocol is not optional; it is a core requirement of responsible project management. You, or an independent inspector you hire, must be present at three critical moments.
The Three-Point Foundation Inspection Protocol is a mandatory sequence of checks:
- Inspection 1 (Post-Excavation/Pre-Pour): Before any concrete arrives, you must verify that the footing dimensions match the engineering plans exactly. Confirm that all drainage systems are correctly installed and that the steel rebar placement, size, and spacing meet the structural specifications to the millimeter.
- Inspection 2 (Pre-Backfill): After the concrete has been poured and has had adequate time to cure (a minimum of 28 days for full strength), but *before* the foundation is buried by backfill, a second inspection is critical. This is your only chance to test the integrity of the waterproofing membrane, verify that all exterior insulation is properly installed, and check for any cracks or defects from the curing process.
- Inspection 3 (Final Grade): Once backfilling is complete, a final inspection must confirm that the surrounding ground slopes away from the foundation by a minimum of 2% to ensure proper water runoff. All drainage systems should be tested for functionality.
This macro-level view highlights the material integrity that must be verified during inspection—the texture of the concrete and the precise placement of rebar.

Crucially, rigorous documentation must accompany each stage. This includes time-stamped photos of rebar placement before the pour, collecting all concrete delivery tickets (which specify the mix and strength), and creating a video walkthrough of the entire foundation, especially the waterproofing, before it is permanently hidden. This evidence is your quality assurance and your leverage if any issues arise later.
How to Build a Real Estate Financial Plan That Secures Bank Approval?
A financial plan for a self-build is not just a personal budget; it is a formal business case presented to a lender. Banks do not finance dreams; they finance de-risked, professionally managed projects. To secure a construction loan, your documentation must demonstrate not just what you plan to spend, but how you plan to manage uncertainty and control costs. An Excel spreadsheet with a list of expenses is insufficient. You need a comprehensive financial package that speaks the language of risk mitigation.
The cornerstone of a bank-ready plan is a detailed cost breakdown that goes far beyond materials and labor. It must include line items for all soft costs: design fees, engineering costs, permits, insurance, and landscaping. The second non-negotiable component is a structured contingency plan. A generic line item for “10% contingency” is an immediate red flag for lenders. Your plan must be more sophisticated. As construction finance experts indicate, a 20% contingency is the recommended standard for self-build projects. This buffer should be broken down with defined release triggers, specifying which funds are allocated to which risks (e.g., 5% for material price increases, 5% for weather delays, 10% for general scope creep).
Finally, your plan must include a forward-looking cash flow projection. This document maps your expected monthly expenses (drawdowns) against the construction schedule’s key milestones. It shows the lender that you have a firm grasp on the project’s liquidity and will not run out of funds mid-phase. This level of professional documentation transforms your application from a hopeful request into a credible investment proposal.
The table below, based on insights from construction finance guides, outlines the essential components of a financial package that demonstrates professional-level planning and risk awareness to a lender.
| Document Type | Key Elements | Bank Focus Areas | Common Mistakes |
|---|---|---|---|
| Cost Breakdown | Line items for materials, labor, fees, landscaping | Completeness, market rates | Missing soft costs (15-20% typical) |
| Contingency Plan | 20% buffer, release triggers defined | Risk mitigation strategy | Generic percentage without specifics |
| Cash Flow Projection | Monthly drawdown schedule aligned with build stages | Liquidity management | Misaligned with actual payment needs |
| Project Pre-Mortem | Top 5 risks with mitigation plans | Risk awareness | Overly optimistic scenarios |
How to Prioritize Energy Efficiency Renovations for Maximum Bill Reduction?
In a new build or major renovation, energy efficiency is not an “add-on”; it is a core system that must be designed with a strict order of operations. Homeowners often make the costly mistake of prioritizing high-tech, visible features like solar panels or smart thermostats before addressing the fundamentals. This is like trying to fill a leaky bucket by installing a bigger faucet. The maximum return on investment comes from a “building envelope first” approach, which systematically reduces energy loss before you spend a single dollar on energy generation or high-efficiency equipment.
The absolute first priority is air sealing. Uncontrolled air leaks through gaps in the building envelope can account for a significant portion of heating and cooling costs. Using a thermal leak detector, you can identify every penetration—around windows, pipes, and electrical outlets—and seal them with the appropriate materials. This relatively low-cost step provides an immediate and substantial return. Only after the building is airtight should you address insulation. The priority here is the attic, as heat naturally rises, followed by the walls. Upgrading insulation to modern standards is one of the most cost-effective long-term investments you can make.
Windows and HVAC systems should be considered only *after* the building envelope has been fully optimized. Installing expensive triple-pane windows or a high-efficiency heat pump in a leaky, poorly insulated home is a waste of capital, as the equipment will be forced to work harder to compensate for the envelope’s deficiencies. By first minimizing the home’s energy demand, you can then install a smaller, less expensive, and more efficient HVAC system. This sequenced approach, as demonstrated in many energy-efficient designs like Scandinavian-inspired self-builds, ensures that every dollar invested in efficiency delivers the maximum possible reduction in your future energy bills.
Key Takeaways
- Budget overruns are systemic failures rooted in poor pre-construction planning, not just individual expenses.
- A disciplined sequence of operations—from team selection to foundation inspection—is the most effective form of budget control.
- Risk mitigation through proactive scheduling, thorough due diligence, and a structured contingency plan is non-negotiable for securing financing and project success.
How to Execute a Professional-Level Interior Design Project on a Mid-Range Budget?
The interior design phase is where a well-managed budget often disintegrates. Faced with a finished shell, the temptation to overspend on high-end finishes and furnishings is immense. However, achieving a professional, high-impact look on a mid-range budget is not about sacrifice; it’s about strategic allocation. It requires applying the same disciplined, systematic approach used for the structural build to the aesthetic choices. The core principle is the “Splurge vs. Save” matrix: deliberately over-investing in a few key areas while aggressively saving on others.
Your “splurge” items should be the high-touch, high-use elements that define a space’s quality and your daily experience. In the kitchen, this means the faucet, cabinet hardware, and countertop—items you interact with constantly. In the living room, it’s the sofa and the primary lighting fixture. In the bedroom, the mattress and quality bedding are non-negotiable. These are the workhorses of your home, where durability and feel provide a disproportionate return on investment. As one experienced self-builder advises, this targeted approach is key.
We always have a conservative budget when it comes to interiors. I never forgo quality pieces that get a lot of use, but I make small compromises elsewhere to even out the finances.
– Wendy Maxwell, Homebuilding UK Self-Build Case Study
Conversely, the “save” category includes items that are easily changed or have less impact on functionality. This includes decorative elements like side tables, throw pillows, and art, which can be sourced from more affordable retailers or upgraded over time. In the kitchen, standard upper cabinets and an inexpensive backsplash tile can look just as good as their high-end counterparts when paired with a stunning countertop and quality hardware. The same logic applies to the bathroom: splurge on the shower fixtures and vanity top, but save on accessories and storage units. This disciplined trade-off allows you to create a space that feels luxurious and custom without derailing the entire project budget at the final hurdle.
To put these principles into action, the logical next step is to begin building your project’s pre-mortem analysis, starting with the non-negotiable due diligence protocols that form the true foundation of an on-budget build.