
Peak physical fitness does not grant you immunity to altitude sickness; disciplined physiological management does.
- Acclimatization is a non-negotiable biological process, not a sign of weakness.
- Specific eccentric and Zone 2 training provides more relevant conditioning than raw cardio.
- Knowing how to monitor your neurological baseline is more critical than pushing through a headache.
Recommendation: Adopt a strategic approach: plan your ascent like an architect, train the right systems, and listen to your body’s data.
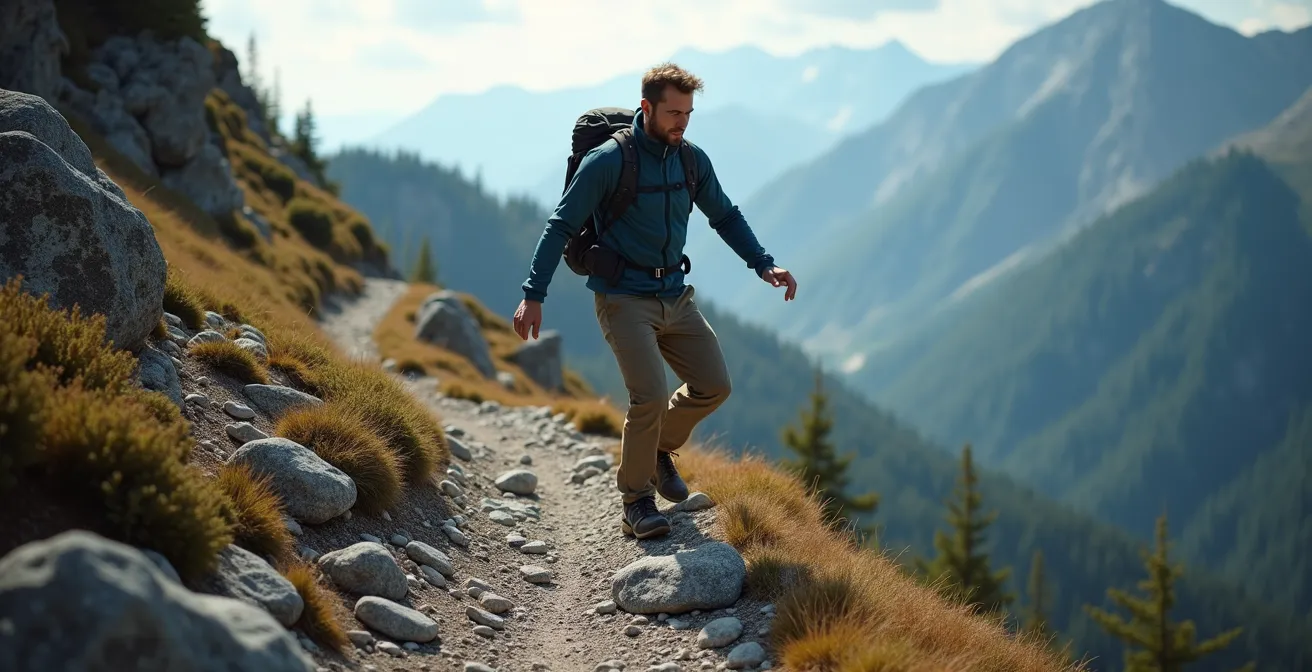
For every aspiring high-altitude trekker, the training montage is a familiar fantasy: weeks of punishing runs, stair-climber sessions, and heavy pack hikes, all to forge an unbreakable body ready for the thin air of the Himalayas or the Andes. The common wisdom dictates that the fitter you are, the better you’ll fare. But what if the marathon runner gasping for air at 4,000 meters isn’t an anomaly? What if the real key to success at altitude has less to do with your VO2 max and more to do with disciplined physiological management?
The mountain doesn’t care about your personal bests. It operates on a strict set of rules governed by barometric pressure and oxygen availability. To ignore them is to invite failure, or worse. This is where the paradigm must shift from a brute-force fitness approach to a strategic, intelligent one. It’s not about being strong enough to power through the symptoms of Acute Mountain Sickness (AMS); it’s about being disciplined enough to prevent them from ever taking hold. This requires a deep understanding of acclimatization architecture, specific training modalities that build resilience, and an unwavering respect for the mountain’s timeline, not your own.
This guide moves beyond the platitudes of “go slow” and “drink water.” We will deconstruct the process of high-altitude preparation into a series of strategic decisions and actionable protocols. We will explore why your genetics can matter more than your gym routine, how to build an itinerary that respects your body’s adaptation process, and how to train for the specific stresses the mountain will place on your system—from the ascent’s oxygen debt to the descent’s brutal impact.
The following sections break down this strategic approach, providing the framework you need to move from an anxious hiker to a confident mountaineer. Consider this your briefing on the rules of engagement for high-altitude environments.
Summary: A Strategic Guide to High-Altitude Trekking
- Why Fitness Level Does Not Guarantee Immunity to Altitude Sickness?
- How to Plan “Climb High, Sleep Low” Days into Your Itinerary?
- Acetazolamide or Natural Pace: Which Strategy Has Fewer Side Effects?
- The Headache You Must Not Ignore: Signs of HACE and HAPE
- How to Train for Downhill Impact to Save Your Knees on the Descent?
- How to Implement Zone 2 Training to Improve Heart Health Without Burnout?
- How to Start Kitesurfing Safely When You Have No Surfing Experience?
- How to Plan a Carbon-Neutral Vacation Without Staying Home?
Why Fitness Level Does Not Guarantee Immunity to Altitude Sickness?
The most dangerous myth on the mountain is that supreme fitness is a shield against altitude sickness. It’s a fallacy that has humbled countless elite athletes. The truth is, your susceptibility to AMS is governed more by your internal machinery than your engine’s horsepower. The primary determinants are factors you can’t train in a gym: your genetic makeup and your body’s inherent response to low-oxygen environments.
Your unique Hypoxic Ventilatory Response (HVR) dictates how effectively your body increases its breathing rate to compensate for lower oxygen levels. This response varies dramatically between individuals and is independent of cardiovascular fitness. Furthermore, specific genetic markers, such as variations in the EPAS1 gene, play a significant role in how efficiently your body regulates oxygen. These are pre-set biological parameters. A far better predictor of your performance is not your VO2 max, but your history of previous exposure to altitude. The body remembers, and prior acclimatization builds a form of physiological resilience that no amount of sea-level training can replicate.
Case Study: The Power of Pre-Exposure
A compelling study highlighted this principle clearly. It observed mountaineers ascending to 4,500 meters and found that those who had spent at least five days above 3,000 meters in the two months prior had significantly fewer cases of acute mountain sickness. This was a stark contrast to a group of equally fit individuals without this pre-exposure, demonstrating that recent altitude history is a more reliable indicator of immunity than fitness level alone.
Therefore, your preparation must shift focus from simply maximizing fitness to understanding your personal predispositions. The rate of ascent, hydration status, and quality of rest are the tactical levers you control, and they have a far greater impact on your well-being than your race times.
How to Plan “Climb High, Sleep Low” Days into Your Itinerary?
The most powerful tool in your acclimatization arsenal is not a pill or a piece of gear; it’s your itinerary. Building a trek based on the “Climb High, Sleep Low” principle is the cornerstone of what we call acclimatization architecture. This isn’t just about “going slow”; it’s a deliberate, strategic approach to exposing your body to higher altitudes during the day and then descending to a lower elevation to sleep. This process stimulates the production of red blood cells and other adaptations while allowing your body to recover in a more oxygen-rich environment overnight.
Proper planning means your daily sleeping elevation should not increase by more than 300-500 meters once you are above 3,000 meters. For every 900-1,000 meters of elevation gained, you must schedule a full rest day or an acclimatization day. On these days, you should undertake a short hike to a higher altitude (a 300-400 meter spike) before returning to the same lodge for a second night. This methodical approach is the difference between a successful summit and a hazardous evacuation. Monitoring your blood oxygen saturation (SpO2) with a pulse oximeter each morning provides a crucial data point to validate your acclimatization status. Your reading should remain within a stable range, typically not dropping more than 2-3% from your morning baseline at that altitude.
The following table starkly illustrates the difference between a dangerously aggressive itinerary and a safe, well-structured one, as outlined in an analysis of safe altitude practices.
| Aspect | Red Zone (Dangerous) | Green Zone (Safe) |
|---|---|---|
| Daily Sleeping Gain | >500m above 3000m | 300m above 3000m |
| Acclimatization Days | None below 4000m | Every 900m elevation gain |
| Daytime Excursions | No altitude variation | 300-400m spikes with descent |
| SpO2 Monitoring | Not tracked | Morning baseline within 2-3% |
| Risk Level | High AMS/HACE/HAPE risk | Minimal complications |
Treat your itinerary not as a schedule to be rushed through, but as a prescription for your body’s adaptation. It is the most critical element of your physiological management strategy.
Acetazolamide or Natural Pace: Which Strategy Has Fewer Side Effects?
The debate between using Acetazolamide (Diamox) and relying solely on natural acclimatization is a central one in high-altitude preparation. Neither is a “better” strategy; they are different tools for different contexts. Acetazolamide is a carbonic anhydrase inhibitor that forces the kidneys to excrete bicarbonate, which acidifies the blood and stimulates breathing, mimicking the body’s natural acclimatization process but at an accelerated rate.
For trekkers on a tight schedule or those with a known history of severe AMS, it can be a valuable prophylactic tool. Indeed, clinical studies demonstrate that acetazolamide at a dose of 125mg twice daily can reduce the risk of AMS by a significant 48%. However, it is not without side effects. The most common include a tingling sensation in the hands and feet (paresthesia), frequent urination, and a metallic taste, particularly with carbonated beverages. For some, these side effects can be as disruptive as mild AMS itself.
The “natural pace” strategy, on the other hand, has only one side effect: it requires more time. By adhering strictly to the acclimatization architecture discussed previously, you allow your body to adapt organically, without pharmaceutical intervention. This is often the preferred method for purists and those with flexible itineraries. The key is to understand that Acetazolamide is not a substitute for a proper ascent profile. As the Acibadem Health Point Medical Team wisely advises:
Acetazolamide should complement, not replace, good acclimatization strategies.
– Acibadem Health Point Medical Team, The Acetazolamide Altitude Sickness Prevention Guide
The disciplined choice is to build a safe itinerary first. Then, in consultation with your doctor, decide if Acetazolamide is a useful adjunct to your personal risk profile and schedule, not a crutch to enable a dangerously fast ascent.
The Headache You Must Not Ignore: Signs of HACE and HAPE
At altitude, not all headaches are created equal. A mild headache is a common symptom of Acute Mountain Sickness and can often be managed with hydration, rest, and mild analgesics. However, a persistent headache that does not respond to treatment, especially when accompanied by specific neurological symptoms, is a red-line warning. It may signal the onset of High-Altitude Cerebral Edema (HACE), a life-threatening condition where the brain begins to swell. Similarly, a severe dry cough and extreme breathlessness at rest can indicate High-Altitude Pulmonary Edema (HAPE), where fluid accumulates in the lungs.
The most critical sign of HACE is ataxia—the loss of coordination and balance. A simple field test is to have the person walk a straight line, heel-to-toe. Any stumbling, swaying, or inability to perform this simple task is a definitive sign of ataxia and a medical emergency. This is the point where you must establish a clear “neurological baseline” for yourself and your team members. Any deviation from this baseline requires immediate action. Do not “wait and see” or “sleep on it.” The only effective treatment for HACE or HAPE is immediate and rapid descent.
The imperative to act is not an exaggeration. It is the absolute law of the mountain. Pushing through these symptoms can lead to a fatal outcome within hours.
Case Study: The Necessity of Immediate Descent
The critical nature of this rule was demonstrated by the case of a trained climber at 5,300m in the Himalayas. He developed classic signs of HACE-related ataxia, including an inability to walk straight and upper-body swaying. Recognizing the gravity of the situation, his team initiated an immediate descent of at least 500 meters, even though it was nighttime. This rapid response to neurological symptoms was the correct and life-saving decision.
Your ego is your greatest enemy here. The discipline to recognize a serious symptom and abandon the ascent is the mark of an experienced mountaineer, not a failure.
How to Train for Downhill Impact to Save Your Knees on the Descent?
Most trekkers focus their training on the cardiovascular demands of the ascent, only to be undone by the brutal, knee-shattering reality of the descent. Weeks of hiking downhill with a heavy pack generates immense eccentric load on your quadriceps and places enormous stress on your knee joints. If you haven’t specifically prepared for this, the pain can become debilitating. The solution is to integrate eccentric training into your preparation, which focuses on strengthening muscles as they lengthen under load—the exact motion of walking downhill.
This type of training isn’t about lifting heavier weights; it’s about controlling the downward phase of a movement. Exercises like “negative” calf raises, where you lower your heels slowly off a step, and single-leg squats with a controlled 5-second descent, build the specific resilience your legs will need. The goal is to make your muscles so adept at absorbing impact that your joints don’t have to. Another crucial element is mastering the use of trekking poles. They are not just for balance. When used correctly, they become an extension of your arms, transferring a significant portion of the load from your legs to your upper body. In fact, biomechanical studies show that pre-loading trekking poles achieves up to a 30% reduction in knee impact forces.
By dedicating specific training time to these protocols, you are investing directly in your ability to complete the trek comfortably and without injury. It’s a classic example of training smarter, not just harder.
Action Plan: Eccentric Training Protocol for Downhill Preparation
- Negative calf raises: Perform 3 sets of 15 reps, focusing on lowering your heels slowly over a 5-second count off a step.
- Box step-downs: Start with a 6-inch box and progress to a 12-inch box over 8 weeks, controlling the descent of your non-working leg.
- Single-leg squats with 5-second descent phase: Complete 3 sets of 8-10 repetitions per leg, emphasizing the slow, controlled lowering motion.
- Weighted pack descents on stadium stairs: Do this twice a week for 20-30 minutes to simulate real-world conditions.
- Trekking pole pre-load practice: Actively practice planting your poles about two feet ahead of you and loading them with weight before your foot impacts the ground.
Neglecting downhill preparation is one of the most common mistakes trekkers make. Don’t be one of them. Your knees will thank you on day one of the descent.
How to Implement Zone 2 Training to Improve Heart Health Without Burnout?
While we’ve established that peak fitness isn’t a guarantee against AMS, building a robust aerobic base is a crucial component of your physiological management. The most efficient way to do this for high-altitude endurance is through Zone 2 training. This involves sustained exercise at a low intensity, typically 60-70% of your maximum heart rate. It’s the “conversational pace”—you should be able to hold a conversation without gasping for breath.
The magic of Zone 2 lies in what it does at a cellular level. As noted by high-altitude training expert Matt Schonwald:
Zone 2 training improves mitochondrial efficiency – the ability to produce energy with less oxygen.
– Matt Schonwald, The Mountaineers Training Guide
This is the essence of oxygen discipline. You are teaching your body to be more fuel-efficient in the exact environment where fuel (oxygen) is scarce. Unlike high-intensity interval training (HIIT), which is valuable but metabolically costly, Zone 2 builds deep, sustainable endurance without leading to burnout or injury. The majority of your training volume—around 70-80%—should be dedicated to these low-intensity sessions. This could be long, steady hikes, slow jogs, or cycling. The key is consistency and duration over intensity.
Integrating this into a comprehensive plan is straightforward. The plan below provides a sample structure that balances a strong Zone 2 base with necessary high-intensity and altitude-specific work, as detailed in an effective high-altitude training plan.
| Week | Zone 2 Base (70%) | High Intensity (15%) | Altitude Specific (15%) |
|---|---|---|---|
| 1-4 | 3x45min runs/hikes | 1x20min intervals | 1x2hr weighted hike |
| 5-8 | 4x60min sessions | 1x30min tempo | 1x3hr pack hike with elevation |
| 9-12 | 4x75min sessions | 1x HIIT session | Weekend altitude exposure 3000m+ |
By prioritizing Zone 2, you build a resilient aerobic engine that performs efficiently when oxygen is limited, which is the ultimate goal of your physical preparation.
How to Start Kitesurfing Safely When You Have No Surfing Experience?
This title might seem out of place in a guide about mountains, but the discipline required to learn a technical, high-consequence sport like kitesurfing holds a direct and powerful lesson for the aspiring mountaineer. A novice kitesurfer does not simply grab a kite and head into the surf. To do so would be reckless, inviting disaster. Instead, they submit to a proven methodology, taught by an experienced instructor. They learn about the wind window, safety systems, and body mechanics on safe, dry land long before they ever touch the water.
This is the exact mindset required for high-altitude trekking. The mountain, like the ocean, is a powerful environment that is indifferent to your ambition. Your ego and desire to “just get going” are your biggest liabilities. Just as a kitesurfer must respect the power of the wind, a trekker must respect the unyielding reality of barometric pressure. You cannot fight it; you must work within its rules. The “instructor” in your case is the collective wisdom of mountaineering science and the experience of countless guides.
The lesson is one of humility and process. Do not skip the foundational steps. Do not assume your general fitness will allow you to bypass the methodical process of acclimatization. Mastering the basics—like planning a safe itinerary, understanding your own physiological response, and knowing emergency protocols—is your “dry land” training. Attempting a rapid ascent without this foundation is the equivalent of launching a powerful kite in a gale on your first day. The outcome is predictably poor. Embrace the process, respect the forces at play, and trust the methodology.
Key Takeaways
- Altitude success is a function of physiological management, not peak fitness. Your genetic response and acclimatization history are key.
- A “Climb High, Sleep Low” itinerary is your primary tool. A daily sleeping gain of over 500m above 3000m is a red flag.
- Training must be specific: Zone 2 for mitochondrial efficiency and eccentric loading to prepare for the brutal impact of descents.
How to Plan a Carbon-Neutral Vacation Without Staying Home?
Planning a complex journey with a non-negotiable constraint—such as achieving carbon neutrality—is the perfect metaphor for high-altitude trekking. In a carbon-neutral trip, you operate within a strict “carbon budget.” You cannot simply do whatever you want; every decision, from transport to accommodation, is measured against this limiting factor. You must be creative, disciplined, and strategic to achieve your goal without exceeding your budget.
On a high-altitude trek, your non-negotiable constraint is your body’s ability to acclimatize. Your “acclimatization budget” is finite and dictated by physiology. The “Climb High, Sleep Low” principle, the maximum daily ascent of 300-500 meters, the mandatory rest days—these are the rules of your budget. Exceeding this budget by ascending too quickly incurs a steep “physiological debt,” which manifests as AMS, HACE, or HAPE. The phrase “without staying home” is also key; the goal is not to give up on the summit, but to find a strategic path to reach it safely within the rules.
This reframes the entire expedition. It’s no longer a physical race but a logistical puzzle. Your success depends on your quality as an architect and a manager, not just as an athlete. Are you willing to add two extra days to your itinerary to ensure proper acclimatization? Are you disciplined enough to turn back if you’re showing signs of exceeding your budget, even if the summit is in sight? This is the ultimate test of a true mountaineer. The mountain rewards the strategist who respects the budget, not the gambler who goes all-in and hopes for the best.
The mountain rewards discipline, not just ambition. By adopting a strategic, patient, and informed approach, you honor the challenge and vastly increase your chances of a safe and successful journey. Start building your strategic high-altitude plan today.